In this article we are going to explore how you can select a profile based on the printer name or a part of the printer name. This will be a specific configuration of the profile recognition.
Configuration
We will asume that you have more than one CQ printers. In our example we will have PrnADepIT, PrnBDepIT and PrnADepHR (Printer A and B for IT department; Printer A for human resources department).
To create multiple CQ printers (print queues):
- Log in to the admin panel of Print&Share CQ using a web browser.
- Navigate to
Manage > System Setup > CQ Printers. - Under XPS Printers (V4), click Add printer and give the name
PrnADepIT.
Click Add printer again and give the namePrnBDepIT.
Do the same forPrnADepHR.
This will create three extra XPS Printers (V4).
Note: to make the printers available to end-users, you have to share them. You can read more here.
Next we are going to create an extra profile (you can skip this if you already have an existing profile).
This profile will be called Printer A:
- Navigate to
Manage > Workflow > Profile. - Create a profile by clicking Create new and give the profile the name
Printer A. - Scroll down to the Channels section and add for example a Printer-channel.
(one or multiple different channels could be added to a profile, according your needs.) - Save all channel settings and get back to the main Profile page.
Next we are going to configure profile recognition.
We want to select and execute our profile (Printer A) when users print to either PrnADepIT or PrnADepHR.
This example will configure the recognition in such a way that we look if our printer name contains the string PrnA. We will use regular expressions for this. According to your needs, you might want to select a different part of the name and thus use different regular expressions.
- Navigate to
Manage > Workflow > Profiles. - Click the Edit-button next to the profile called
Printer Ato edit this profile. - Next to the
Profile recognitionlabel, click Edit to configure the profile recognition. - Enable the
Condition is validcheckbox and from the dropdown menu selectAdd parameter.
This will bring the recognition editor dialog. (In case you closed this dialog you can double-click the text @[CContent-] to show the editor again.)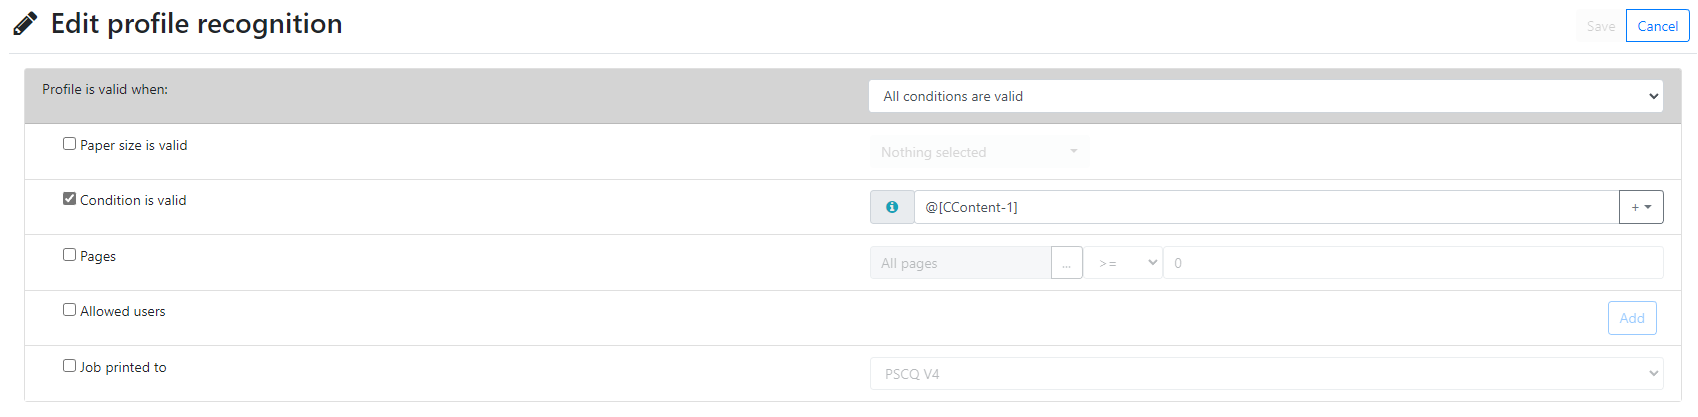
- In the General tab, select
Source:Original job,
Recognition type:Job property,
Property:Printer.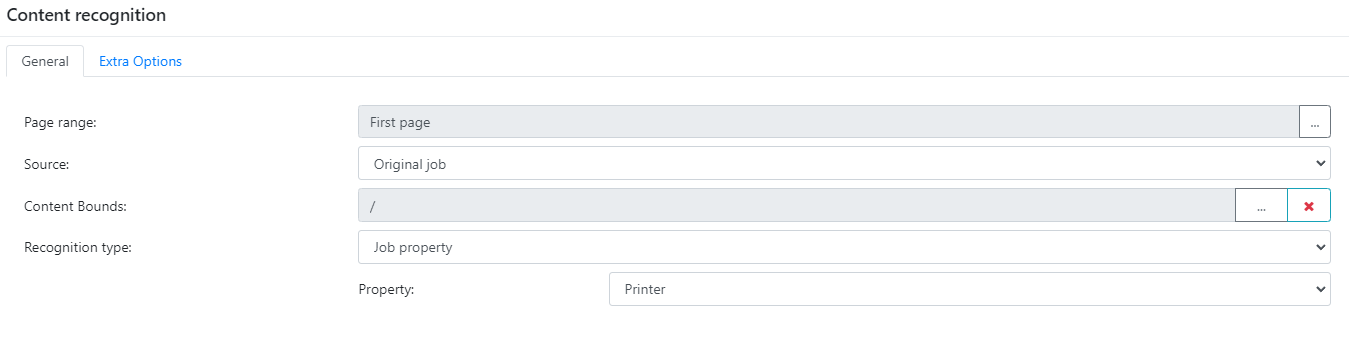
- Go to the Extra Options tab, here we will configure an adjuster using regular expressions (regex) to select a part of the printer name. In our case it will be
PrnA.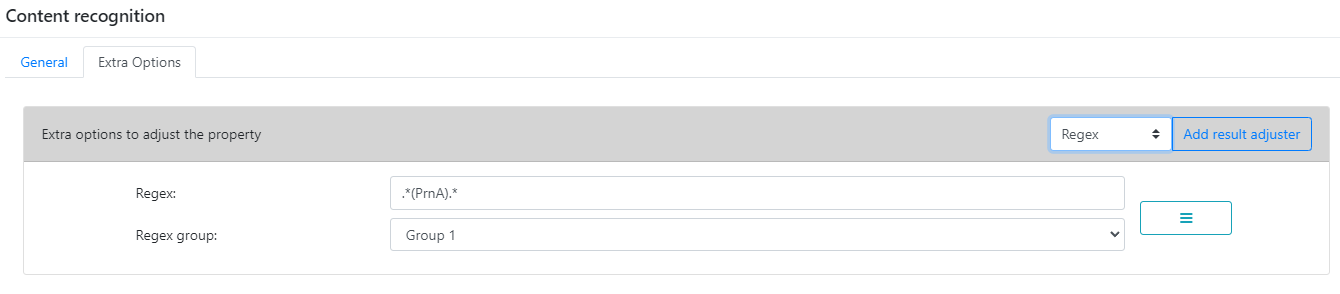
- From the dropdown select
Regexand click Add result adjuster. - For the Regex: use
.*(PrnA).*,
and Regex group: selectGroup 1. - Click OK to save and close the Content recognition dialog.
- Click Save to close the profile recognition.
Note: the order of the profiles is important. Make sure you set the profiles with profile recognition at the top in the profiles list. You can read more about this why on how to change the order here.
Testing
When somebody prints to PrnADepIT or PrnADepHR the profile will be executed, not when somebody prints to PrnBDepIT, because we select the profile based on a part of the name PrnA.
Extra
Note that it is also possible to link a print queue to a profile.