This article describes how you can limit application permissions by applying an application policy. This can be useful when you have for example a desktop application that connects to Exchange Online and sends emails using Modern Authencation with a client secret.
Earlier you've registered an application (app registrations) in the Azure portal that uses a client secret allowing your application to connect with Exchange Online (EXO).
In many cases it might be recommened to limit the accounts from which the application can email.
We won't go into detail about this, but just give you the impetus to get you started on configuring this further.
Limiting EXO and applying an application policy can (only) be configured by using PowerShell.
Configuration
- Install PowerShell [1] if not yet installed.
(In this example we are using PowerShell version 7.2.7. Run the command$PSVersionTableto see your PS version)
- Install the Exchange Online PowerShell module or run the PowerShell command
Install-Module -Name ExchangeOnlineManagement - Run cmdlet
Connect-ExchangeOnlineto connect to EXO via PowerShell.
This will open a browser to select an account and login.
A messageAuthentication complete. You can return to the application. Feel free to close this browser tab.might appear.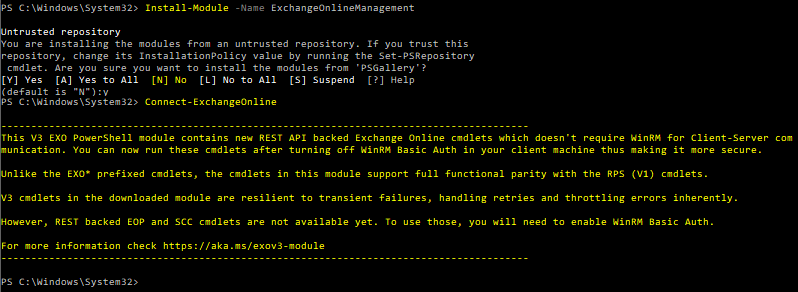
- Open EAC (Exchange Admin Center) and navigate to
Recipients > Groups > Main-enabled security. - Find a group name to use in the Mail-enabled security or create a new group. This group will be used to restrict access
- Click Add a group.
- Select the Mail-enabled security option and click Next.
- For Name: use
WinkingPrintandShareSecureGroupand Description: use fill inLimit the Winking Print&Share application to only email as specific users.
Click Next. - Assign group owners by clicking Assign owners and after this click Next.
- Assign group members by clicking Add members. This will be the email account(s) who are allowed to send emails in the
Winking PrintandShareapplication we've created in Azure. - Enter the group email address, check and modify the *Communication and Approval settings to your needs and click Next.
- Review and finish adding group and click Create group.
- You should now see the Mail-enabled security group called
WinkingPrintandShareSecureGroupinECA > Recipients > Groups > Mail-enabled security.
- In PowerShell run cmdlet
New-ApplicationAccessPolicy -AppId <ApplicationClientID> -PolicyScopeGroupId <MailEnabledSecurityGroup> -AccessRight RestrictAccess -Description "<ADescriptionHere>"
Parameteris your Client ID from the Winking PrintandShareapp in Azure.
Parameteris the name of the Mail-enabled security group you've just created in EAC or one that already exists.
In our case it might be something like:
New-ApplicationAccessPolicy -AppId 6x9745fgj-92j4-5a3c-6641-66hd6hfj2a3c -PolicyScopeGroupId WinkingPrintandShareSecureGroup -AccessRight RestrictAccess -Description "Limit the Winking Print&Share application to only email as specific users"
If all is fine we've now applied an application access policy.
Verifying the configuration
Use this cmdlet to get an overview of the application access policies:
Get-ApplicationAccessPolicy
Modify the description with the following command:
Set-ApplicationAccessPolicy -identity "<VeryLongIdHere>" -Description "Foo bar"
(You can get identity parameter by first executing the Get-ApplicationAccessPolicy cmdlet.)
You can test the application access policy by running the cmdlet:
Test-ApplicationAccessPolicy -AppId <AzureApplicationClientId> -Identity <emailToTest>
For example:
Test-ApplicationAccessPolicy -AppId 6x9745fgj-92j4-5a3c-6641-66hd6hfj2a3c -Identity foo@company.com
Now try with another account bar@company.com.
You will see that the AccessCheckResult: should be Granted for email accounts that you test who are a member of your Mail-enabled security group called WinkingPrintandShareSecureGroup.
Users who are not a member of the WinkingPrintandShareSecureGroup mail-enabled security group should see Denied as status for AccessCheckResult.
Removing a policy can be done via Remove-ApplicationAccessPolicy -Identity "<identity>".
These changes may take up to 30 minutes to go live.
See also
- Manage mail-enabled security groups in Exchange Online learn.microsoft.com
- Get-ApplicationAccessPolicy learn.microsoft.com
- Send emails via Exchange Online (Office 365) using Modern Authentication (OAuth 2.0) docs.winking.be