Please see this article for the most up-to-date information:
Send emails via Exchange Online (Office 365) using Modern Authentication (OAuth 2.0)
Old documentation
In this article we'll guide you step-by-step on how to configure Ricoh's Print&Share and Microsoft Azure to send emails via Microsoft Office 365.
This information is intended for IT administrators who have access to Microsoft Azure and who have access to the Print&Share configuration.
General
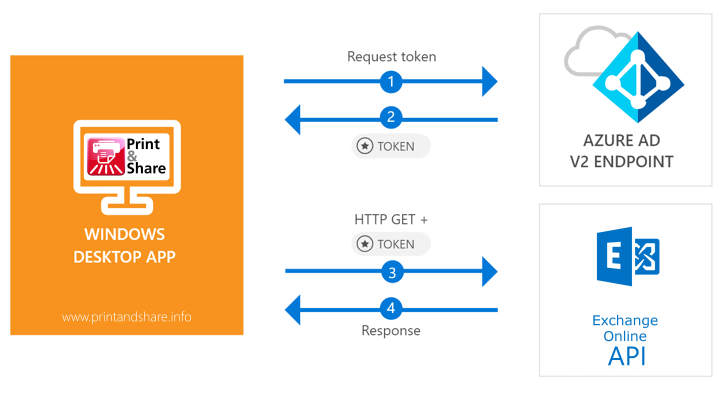
Using Print&Share it is possible to send emails via Microsoft Office 365. Office 365 is a service that runs in the Cloud on Microsoft Azure. Therefor Print&Share will need to have access to this service in Azure.
In the next steps you will configure Microsoft Azure to allow Print&Share to communicate or interact with the MS Exchange service of Office 365. After this one-time configuration in Azure is ready, the settings can be used and configured in Print&Share.
1. Configure Microsoft Azure
Note: a 'blade' is a pane that stays open in Azure. You will notice that instead of opening new dialogs, a new 'blade' opens on the right side.
- Navigate to the Azure Portal via https://portal.azure.com and login with an administrator account of your organisation.
(You will need to have sufficient permissions to be able to configure everything). - If everything is fine you will see your Azure Dashboard.
Go to the App Registration service. This can be reached in different ways, both will result in the same information blade:- Click in the left menu on Azure Active Directory and in the navigation blade click on App registrations
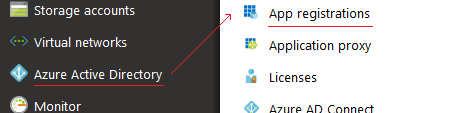
- On the top search input box, search for app registrations and select the result under Services.

- Click in the left menu on Azure Active Directory and in the navigation blade click on App registrations
- (depending on your permissions: to list all apps, click on the View all applications button.)
- Click on New application registration from the App registrations menu.
- In the Create form, fill in
Make sure you replace the orgdomain.extension with your information. Note that the value does not need to be a physical endpoint, but must be a valid URI.Name: Print&Share Application type: Native Redirect URI: https://orgdomain.extension/winking/printandshare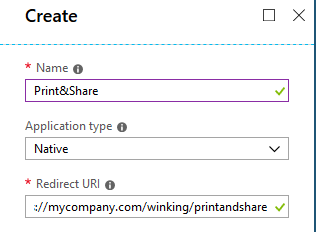
- Click the Create button at the bottom. This will register an application in Azure Active Directory (AAD). You will see an Application ID, and Object ID will be generated.
- Click on Settings
- Click on Properties and fill in the Home page URL:
http://www.printandshare.info.
Click Save to save the changes and close the Properties blade. - Click on Required permissions
- Click on Add to 'Add API access, because Print&Share needs to be able to access the Office 365 services.
- Click Select an API and select Office 365 Exchange Online and confirm by clicking the Select button at the bottom.
- Now you need to Select permissions, to say what Print&Share should be able to do.
- For now we'll enable the DELEGATED PERMISSIONS checkbox so that all permissions are enabled. Confirm by clicking Save.
- Now we have configured the permissions that Print&Share needs to connect to Exchange/Office 365. To apply these permissions to the users in the Active Directory, we need to Grant permmission.
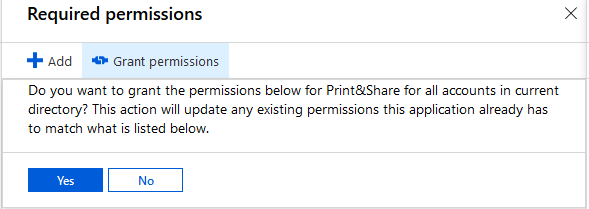
In the Required permissions blade, select Office 365 Exchange Online and click Grant permissions.

- You will be asked to grant the permissions for all accounts in the current directory. Confirm by clicking Yes.
2. Configure Print&Share
- Create a new profile Print&Share with an email channel
- In the Email channel configuration, click on Transport Settings
- Select for Transportation Method the option: Microsoft Exchange/Office 365
- Option Login: select OAuth
- Fill in the settings (see remarks at the bottom):
Authority: https://login.windows.net/common/oauth2/authorize Client/App ID: <your Application ID from Azure> Redirect URI: <your Redirect URI from Azure> - For the group Exchange server url select the option Specify url and use
https://outlook.office365.com/EWS/Exchange.asmx - Click Test settings button to see if everything is configured correctly.
NOTE:
- The Client/App ID can be found in Azure by navigating to:
- Azure Active Directory
- App registrations
- View all applications
- Copy the APPLICATION ID from the list, or click the Print&Share application to see more details
- The Redirect URI can be found in Azure by navigating to:
- Azure Active Directory
- App registrations
- View all applications
- Click the Print&Share application
- Click Settings
- Click Redirect URIs
- Copy the URI there. In most cases it should be similar to:
https://orgdomain.extension/winking/printandshare.
- For the Authority we use the common OAUTH2 Authorization URL:
https://login.windows.net/common/oauth2/authorize. It is possible that you will use a specific Authority URl which has this format:https://login.microsoftonline.com/<tenant>/oauth2/tokenThecan be found by navigating to: - Azure Active Directory
- Properties
- Copy the Directory ID GUID.
Instead of a GUID, Microsoft seems to also accept your
<orgdomain>.onmicrosoft.comin the URL like:https://login.microsoftonline.com/<orgdomain>.onmicrosoft.com/oauth2/tokenAnother way to find the Authority URL is by navigating to: - Azure Active Directory
- App registrations
- Click View all applications
- Click Endpoints at the top menu
- Copy the OAUTH 2.0 TOKEN ENDPOINT URL.
Remarks
Normally it should be possible to register a new application directly via the Microsoft Application Registration Portal, which can be found via https://apps.dev.microsoft.com. However we have found that this service is often unavailable. Using the Azure Portal works better but is a bit more overwhelming at the beginning.
You are receiving this message:
clientAppDisplayName needs permission to access resources in your organization that only an admin can grant. Please ask an admin to grant permission to this app before you can use it It is very likely that you forgot to Grant permissions for Office 365 Exchange Online in Azure.
See also
- https://apps.dev.microsoft.com Microsoft Application Registration Portal
- https://portal.azure.com Microsoft Azure Portal
- https://blogs.msdn.microsoft.com/ahmedamin/2017/10/08/clientappdisplayname-needs-permission-to-access-resources-in-your-organization-that-only-an-admin-can-grant-please-ask-an-admin-to-grant-permission-to-this-app-before-you-can-use-it/