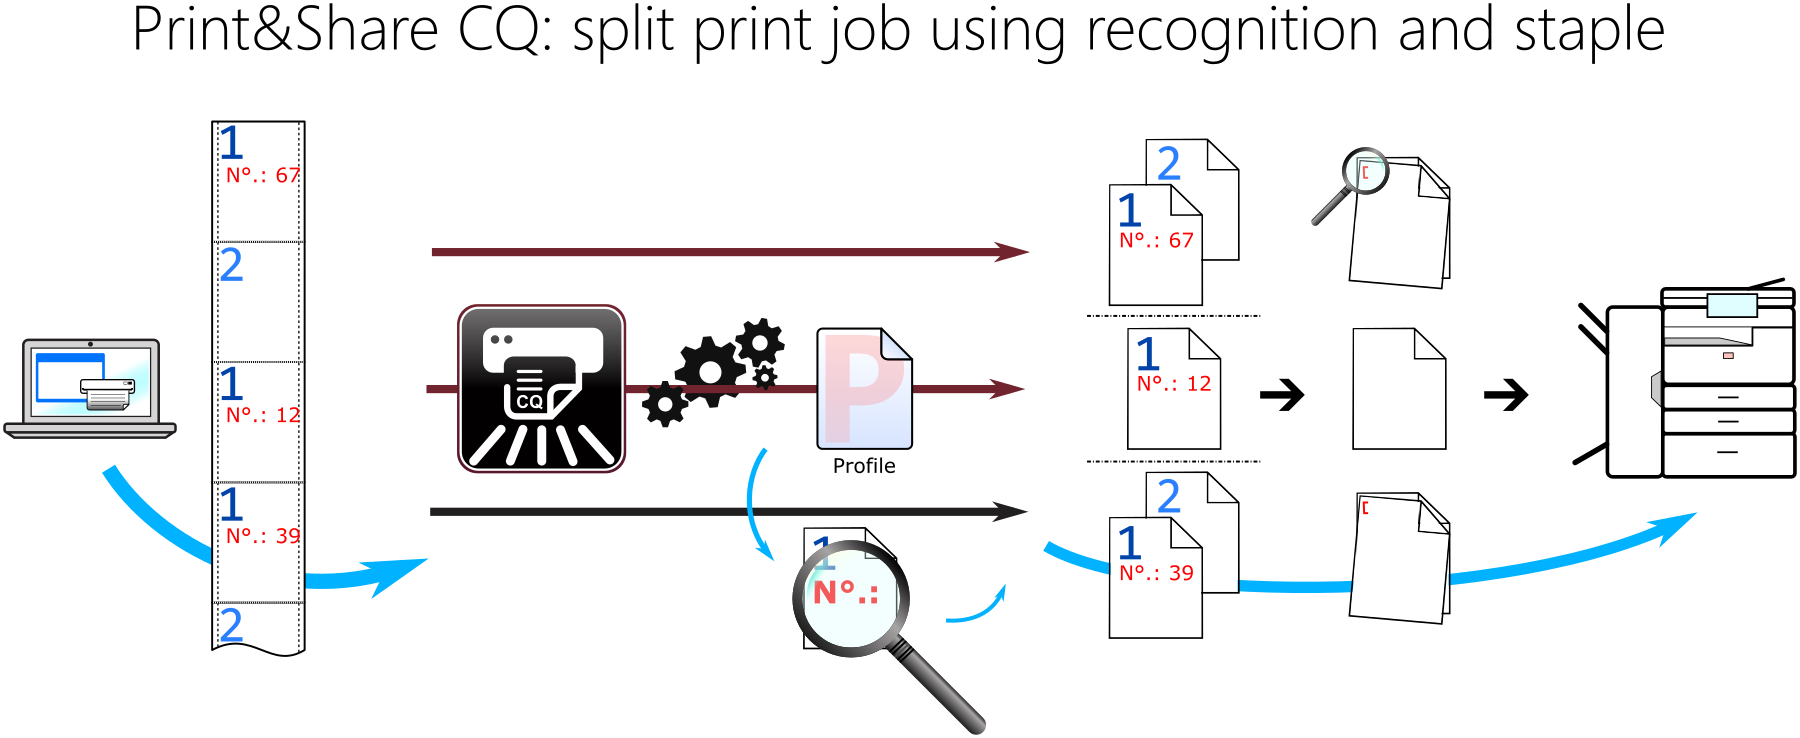
This article will guide you through the process of creating a profile in Print&Share CQ that will split a larger print job into multiple jobs. We will asume that the document contains a unique value on the pages that will be used as a trigger to indicate the start of a new print job. This unique value could e.g. be a customer number, a specific title on the cover page,...
Let us asume we have a print job with 5 pages, page 1,
page 1: customer: XYZ (indicates the start)
page 2
page 3: customer: ABC (indicates the start)
page 4: customer: UVW (indicates the start)
page 5
Our goal is to have this split up and stapled:
print job 1: containing page 1 and page 2, documents for customer XYZ.

print job 2: containing page 3, documents for customer ABC.

print job 3: containing page 4 and page 5, documents for customer UVW.
We will asume that you have some basic knowledge of Print&Share CQ.
Print&Share CQ configuration
- Print your document using Preview mode to Print&Share CQ.
This will allow you to configure the recognition easier with a document preview. - First log in to the admin panel using a web browser.
- Navigate to
Manage > Workflow > Profiles. - Create a profile by clicking Create new and give the profile a name.
- Scroll down to the Channels section, select the Printer-option and click the Add Channel button.
This will add a channel with printing functionality to the profile. - While we are busy with the printer, let's configure it right away. Click the pencil-icon to edit the print channel.
- Select your desired printer, enable Stapling and scroll to the top to Save button to save this printer configuration.
- Back on the Profile-page, click the Edit button next to Incoming job process.
This section will allow us to configure how to split our larger print job into multiple parts. - Select Split and click Add job process option.
This will add a new option that can be configured. - For
Method:select Recognition.
Enable the optionPage where recognition is found is first page of new transmission:.
Click the Edit button ... next to theRecognition to split pages:option. - Here we will list up a specific configuration, depending on your needs or your source document your configuration is likely to differ.
Page range:All pagesSource:Original jobContent Bounds:draw a specifc area in the preview where the unique trigger value is located.Recognition type:Value
Regex type:Custom (regex)Regex:customer: (or fill in a different regular expression)
Regex group:Full match
In this previous step we configured a recogntion to search in all pages of the original job. For every page we will search in a specific area (bounds) for the textcustomer:which is being expressed as a regular expression. - If all is ok, you will see in the dialog (bottom right) the found results, below your preview job. Note that it might sometimes take some time.
- Click Save till you return to the Profile page.
That's it. Now you can try the configuration by printing your document to the Print&Share CQ driver.
(Make sure you are not printing in Preview mode.)
Extra
OCR results in recognition
When you configure a recogntion and you notice that when selecting all text you have good text results but a specific regular expression doesn't return the text you expected.
- Go to
System settings > OCR Settingsand enableAlways use OCR.
This will force Print&Share CQ to always use OCR and not rely on the text from the printed job, which could be often missing or in a different order.
Another thing to check is trying to modify and build up the regular expression step by step. First for example select the first letter of the word and select all other characters. E.g. c.* this will match our label customer:.
Now try to match the first two characters only cu.*. In case this doesn't return a value it might be an indication that the application printed the text with one or multiple spaces. It often happens that text is being printed as separate characters or with one, two or three spaces between the characters. A possible regular expression might now look like c u s t o m e r :. If you are familiar with regular expressions you can easily build up a more complex regex: c[ ]*?u[ ]*?s[ ]*?t[ ]*?o[ ]*?m[ ]*?e[ ]*?r[ ]*?: or maybe (?i)c.*?\W[:].
Preview jobs
By default Print&Share CQ is a service and acts as a kind of black box. A user just prints but doesn't see any document previews. When an administrator configures recognition you often want to see highlights on the found results or draw a specific boundary to limit to search area. For this reason we have enabled a Preview mode available. When enabled, every job being printed with the setting turned on will not be printed but will be added or replaced as a preview job, to use in recognitions. Afterwards you turn off the Preview mode again. Please see the article about Preview mode to learn more.