Download
The Installation Configurator is a utility to collect specific settings.
You can download the Installation Configurator from the URL: www.printandshare.info.
Install the software.
Usage
Start the Installation Configurator via the Windows [start]-button, [All Programs], [Winking].
For Windows 8, 8.1 or 10: Press the WINDOWS-KEY and type Installation Configurator.
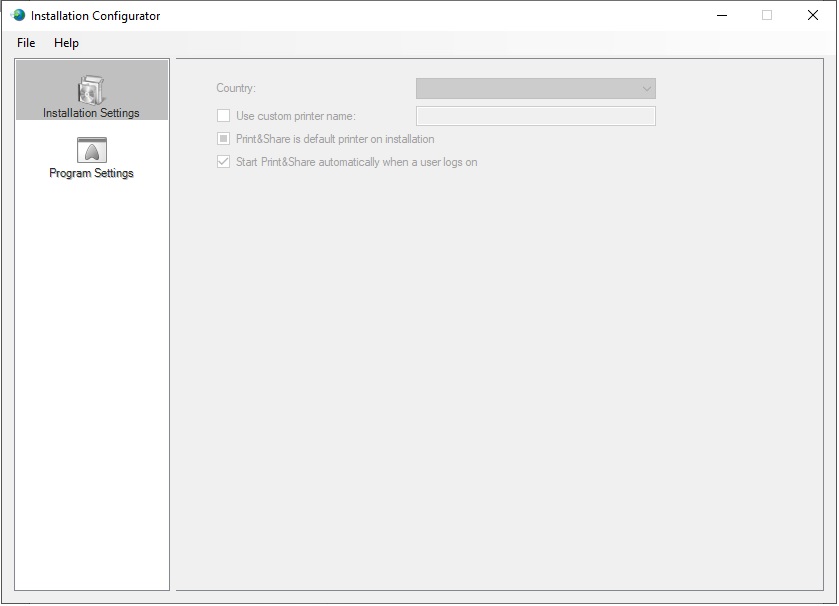
After starting the Installation Configurator you obtain the following dialog:
Click on the menu [File], [New].
A dialog might appear directly after clicking [New] to enter the reference code. This reference code is the one that will be used to activate the clients when doing a roll out with this customized MSI setup.
You can click [Skip] if you don't have this information yet.
Installation Settings
Choose your Country in the Installation Settings. It is important for licensing and support to correctly set your country.
Leave the default options so that Print&Share automatically starts when a user logs on and that Print&Share is the default printer on installation.
Program Settings
When selecting [Program Settings] you will find several tabs that represent sections to configure with default values.
Company and User Information
Use all fields to set your customer contact information. Make sure Company name and Company address are filled in correctly. Via Company logo you can define an image with the organisation logo.
(If some information is not filled in, Print&Share will try to use and extract information from AD.)
Reference:
Enter the reference code here you received after purchase of the product.
After roll out of a customized MSI (with reference code included), the Print&Share installation on the client will obtain an automatic activation via internet for each Print&Share user of the product when being installed.
In case you received one or multiple Software Keys instead of a single Reference Code you should activate Print&Share first on an administrator PC and write down the Reference Code from the [Activation] section in the [General Configuration] of Print&Share.
(You will probably need to have Print&Share installed on an administrator PC anyway in order to create and configure the default set of profiles.)
Opt-in by clicking Enable [Yes I want to receive emails from Ricoh].
Device Settings
Use the fields of the groups Email, Printer and Fax to set your default device settings of the project configuration.
Proxy Settings
Use the fields of the groups ** Global Proxy** and Email Proxy to set your default internet connection settings.
Note: Print&Share version 2.8.3.25 or higher is needed for the specific Global Proxy settings.
UI Settings
This allows you to change additional user interface settings. Leave default, this is only needed in very specific scenarios.
Miscellaneous
Activate the checkbox [Force Settings on Update Installations] to overwrite during updates. The checkbox can also be active for the initial installation.
Choose the settting [Show Wizard On Startup] if you want to show each client a wizard to create profiles (this might not be a good idea when doing a multi-user roll out).
The [Language] option is the language of Print&Share, not the installation language.
In Print&Share a user can always change the language via a right-mouse click on the tray icon and selecting the Language option.
[Available methods for detecting printer status] gives you the option to enable or disable the SNMP and WMI connection.
In Print&Share this is located in the [General Configuration] > [General Settings].
The field [Path where Profiles are loaded and saved] can be individually different for each user which is the default setting [UserSettingsDirectory]\DispatcherConfigs.xml or changed to a common shared network path accessible to all clients e.g. \\MyServer\SharedFolder\DispatcherConfigs.xml.
A bitmap of 300x50 pixels can also be uploaded by [Program logo].
When Enable reporting is active, reporting data will be saved to an MS SQL Server database.
The option [Activate after install] enables you to activate Print&Share automatically or by showing the activation dialog to the client users.
This Activation option will only work if you agree that Print&Share makes a connection to the internet and if a [Reference] code located at the [Company and User Information]-tab page is filled in.
Save as...
Click on [File] to export the settings to a MSI file or save them as a ini-file. See the MSI creation article for more information.