Introduction
Print&Share also allows you to edit the lay-out of documents. We developed the Get More Editor for this purpose. You will have the following extra features at hand: insertion of watermarks, logos, texts, notes, additional images, barcodes, etc.
Get More Editor
You can access the Get More Editor in two ways.
- Channel tabs
You can select a specific channel in a profile via the [Overview] tab.
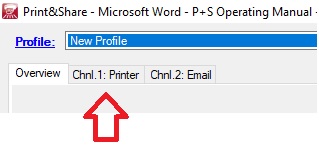 Go to the second tab called [Ch 1: Printer] and click on [Edit].
 - Get More Editor icon
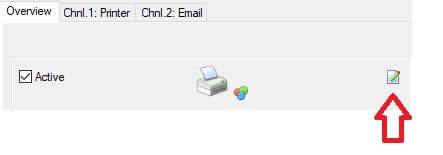
There is also another way to access the Get More Editor: click on the icon in the upper right corner of the respective channel.
- Icon not always present You will not find the Get More Editor icon at all functions of Print&Share. With an e-document channel for example, there is no type page at hand, but only e.g. a XML file. You will find the Get More Editor at the print, file printer and email function.
About the Editor
The Get More Editor consists of a central work area, a toolbar and a properties panel with the details of the respective
part.
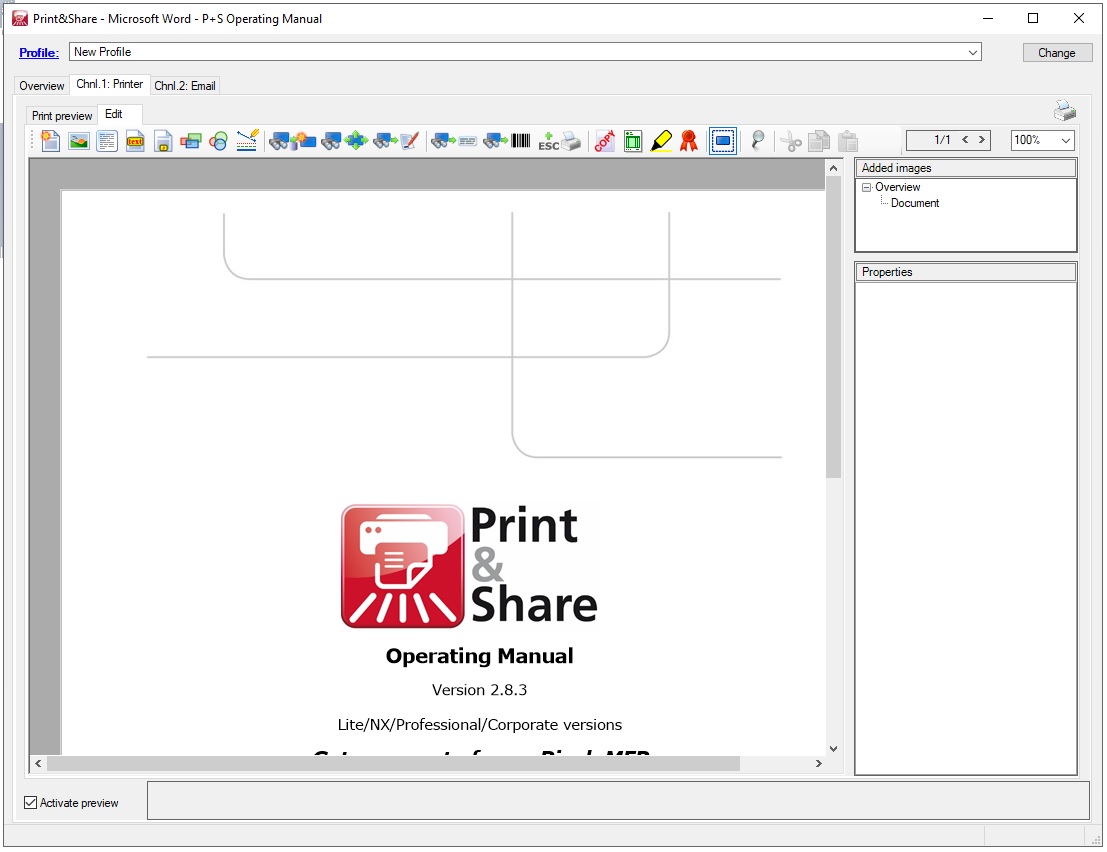
Print preview
You can view the result of the changes you have made to the composition (lay-out) via the first tab named [Overview]. You can also click on the sub-tab called [Print preview]. A new dialog window will open where you will see a larger image of the document. You can also zoom further in and out on the print preview.
Adding basic objects
You can simply click on an icon on the tooblar to add a new object to the composition of a document. You can change the position with the mouse cursor or arrow keys on your keyboard. Every change you make will automatically be saved.
Note : you can also change the order of the images in the composition. You can for example place certain objects behind the printjob in this way.
- Selection You can select multiple objects simultaneously by selecting these whilst you are holding down the CTRL or SHIFT key on your keyboard. If you need to select all objects, then press CTRL+A.
- Icons
The following icons will be discussed below in the order in which they appear:
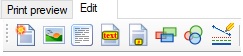
- Insert company logo You can add a predefined (company) logo by clicking on this icon. You can change the logo via [General Configuration] and the tab [Company and User information].
- Insert image You can browse for an image in a folder on your computer with this button. You can change the size, alignment, location, colour, etc. under the [Properties] panel at the right hand side of the Get More Editor. You can also specify a page range, which determines on which pages the image will appear.
- Insert text box You can add a large text block to your document with this button. Font properties, text alignment, rotation and margin can easily be adjusted via the Properties pane.
- Insert note You can add a small note that subtly stands out with this button. For example: you can use this to announce an offer, a date for an open house, etc.
- Page indicator This option allows you to insert a page number, roll number (duplex page) or a sheet number. You can also use another method for selecting the last page. The last page to use can be determined on the basis of recognition using this feature. Without specifying the last page, all pages of the full print job will be charged.
- Insert rectangle If you press this button, a rectangle will be added to the document that will be printed. In this way, you can draw rectangles on an invoice for example.
- Insert circle You can draw a circle in the document that will be printed with this button. It is possible to change the border width and colour of the circle. The background can also be set. Transparency can be set via the Alpha-property.
- Insert line With this option it is possible to draw a line on the document. It is possible to change the line colour, width and dash style. You can also customize the start and end cap. Via the Rotation-property you can change angle of the line. By setting the Rotation property to e.g. 45 and resizing the line-object by moving a corner of the line-object, the line angle can be modified.
Adding objects with Recognition
The following series of icons in the toolbar are all for adding or replacing data/information on the basis of a recognition method. A good example is the placement of a brand logo, which varies depending on the
product that has been included in the offer.
The following icons will be discussed below in the order in which they appear:

- Insert additional values from a table with possible reformatting By clicking on this icon, you can add a new condition to the document using an existing, recognized condition of the print job. For example: you would like to email an invoice to a customer, but the email address is not mentioned in your document. You can e.g. use client numbers to search for this address in a database or Excel list, and add it to the invoice.
- Move values on the document If you click on this icon, you can move information within your print job. For example: you are sending a payment reminder to a customer, but your accountancy software causes another text to appear than the address of the customer in the window of the window envelope. In this case, you can move this information (within the document). After recognition, Print&Share will place a white frame on the original location of the condition. This offers you the possibility to move the information to another place on the document.
- Add object with parameters You can create an additional small document that you can fill with one or more objects. You can add this documentation (canvas) to the composition of your document. Depending on the recognized conditions in the document, one documentation file can be added to the composition. You have several canvas sizes at hand. For example: you can add a signature or photo of an actor from a document to the print job.
- Insert text with parameters By clicking on this icon, you can add text to the print job. The text can be composed from different conditions that have been obtained via recognition.
- Insert barcodes The barcode tool is similar to the textbox tool, but presents its results via a barcode. The barcode font has to be installed onto your computer and must be specified under [General Configuration], [General settings] in the [Barcode font] field. Code 39 is a standard and frequently used barcode font type. There are, however, more barcode types available. Some types require the given value to match with certain conditions. An EAN-13 barcode needs to consist of 13 characters. If this does not match, a message will be displayed and the barcode will not appear on the print. You also have the possibility to include a title above your barcode. In the [Barcode Editor], via the [Add] button next to the Value, you have multiple options to add extra data. It is also possible to use recognized values or insert vCard data.
- Escape sequences This feature of the Get More Editor enables you to copy raw data instructions to the printer before sending your print job to the printer. The instructions concern the supported PDL languages by the printer. The PDL languages that are used are PCL (Printer Command Language) and PJL (Printer Job Language). These languages have been developed by Hewlett-Packard. Please take into account that it is possible that some instructions are reset by the Windows operating system when sending the print job.
Other icons

- Insert watermark By clicking on this icon, y ou can easily add one or multiple** watermark(s) to your print job. You can specify the text, font, transparency, colour, rotation, repetition, etc. via the panel at the right hand side of the Get More Editor.
Note: some greyscales are made out of a combination of colours. Thus, what looks like a grey (black/white) watermark, could turn out to be a coloured watermark once printed.
- Overlay Use this button to insert a file (PDF, DOC, DOCX, RTF, TXT) as alternative for pre-printed documents. Multiple overlays can be inserted. You will be given to choice to select a local file or from an external reference** (e.g. SharePoint, DocuWare, ..).
- Insert certificate or quality grading You can add a predefined image (e.g. certif icate or quality grading) to your print job by clicking on this icon. You can edit the image by holding the Control key (CTRL) while clicking on the icon at the same time.
- Selection tool This sets the manual drawing back to the selection tool. By default if you insert an object e.g. [Insert Circle], the circle is inserted on the document with the selection tool, which allows you to move, drag and resize the object. If you hold down the shift-key while clicking on the [Insert Circle] tool, you are able to manually draw a circle. By clicking the [Selection Tool] again before clicking the [Insert Circle] button again, you reset the manual drawing and a circle object will be added instead of manually drawing it.
- Cut copy paste The icons on the right hand side of the toolbar are respectively [Cut], [Copy] and [Paste]. Their application is linked to the Windows clipboard.
Overview of object features
Depending on the object that you want to insert, settings can be determined on the right side of the Get More Editor. It is possible that the properties of your object are displayed in English. This depends on your installed Windows .NET Framework.
- Size The size (height and width) of the object expressed in points.
- Position The position of the object is determined by X and Y coordinates.
- Edges You can adjust the edges of the object. You can determine the colour and width of an edge.
- Background You can specify the background colour and transparency level (alpha).
- Print range Using a dialog window, you can select on which pages you want to print the object (e.g. all pages, the first page, the last page, etc.).
- Free space search Free space search will search for a free space for the object on the respective page. The page will be subdivided into four quadrants which you can prioritise. The space can also be limited by boundaries. If the object cannot be placed, the object procedure will be executed repeatedly, each time with a 10% reduction until it fits.
- Text You can adjust the space width, foreground colour, frame colour, shadow settings, text alignment, text rotation (0°- 360°) and text margin for a text object. Space width can be useful for printing individual letters of a text in pre-printed check boxes on official forms.
- Indication type This feature relates to the counter that counts the number of pages, the number of rolls of duplex pages or the number of used sheets in a print job.
- Last page This feature contains the recognition settings for determining which page should be used as last page for the indication type. In this way, a barcode or regular expression in a print job can be a sign for the last page of a counter series.
- Recognition The position of the results that were found using a recognition method.
- Result The result can be moved to another position after detection by using the setting [Move result]. In this way, you can also hide or replace the obtained result by specifying the [Action for result] setting.
- Cache result In some environments, it may be necessary to set a cache for quick reaction to changes.
- Barcodes You can specify the symbol type (e.g. code 39), a title, line height, line width, angle or orientation, and an automatic size for barcodes.