In Print&Share you can password protect profiles or protect the complete [General Configuration]. This is recommended when you share your profiles (= clients using the same set of profiles). Otherwise clients could overwrite changes made by an administrator.
Print&Share allows the administrator to set permissions for the users.
This allows the administrator among other settings, to decide who can modify, add or delete profiles.
It is recommended to first log off the clients or exit the Print&Share instances before enabling the password protection. This way you make sure that a client who still had Print&Share running does not overwrite the new configuration again with the current one they had loaded already. If this happens it would make the profiles not password protected anymore.
When publishing profiles or using Terminal Server/RDS: Changes made to a profile by an administrator will only be visible when a user logs in again on a desktop (not the same as resuming a session!) or restarts Print&Share.
We can summarize that protecting profiles is recommended when multiple Print&Share clients use the same set of profiles as it ensures that users only use profiles but don’t edit or override your predefined settings. Via the permission settings you can specify the level of control a user has.
General Information
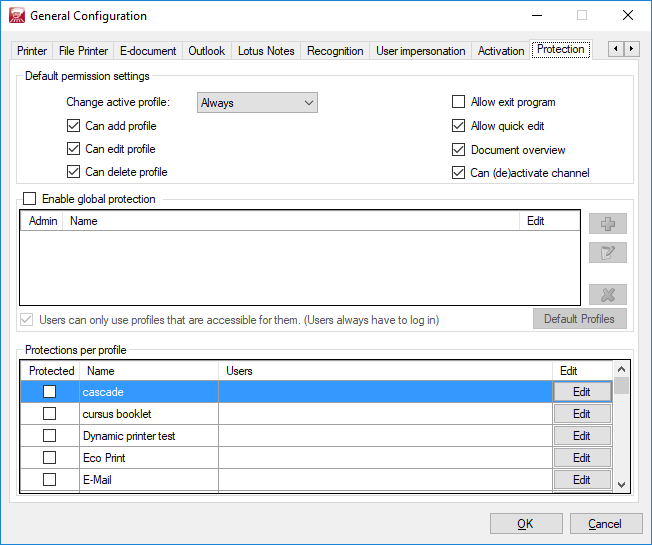
The Protection settings can be accessed via [General Configuration] → [Protection] tab.
On this tab, you can protect the general configuration settings and profiles.
Restrictions can be set for a [Print&Share user], [Windows user/group/computer] and [Organizational Unit (AD OU)].
The options can be split in four main sections:
- Default permissions
- Global protection
- Profile protection
- Channel protection
This is also the order in which the protection settings will be inherit from each other.
1. Default permission settings
[Default permission settings] are the default settings which allow you to define default values, so that you can inherit from these settings.
Configuring these default settings wisely, might save you a lot of time.
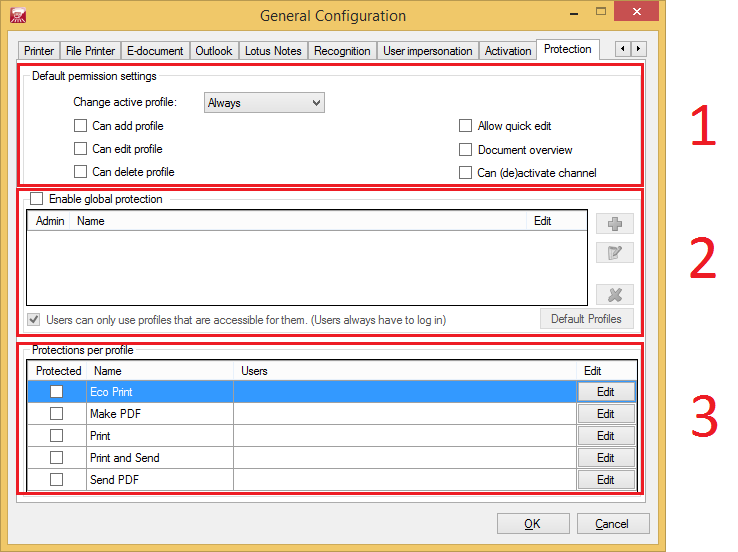
2. Global protection
When [Enable global protection] is selected you can set limitations for users and groups. This is a global protection, which means that each user or group added here can use all profiles but for each user or group the functionality can be limited. These limitations are the same for all profiles for that user or group. Users in this area can have the [Admin] option to make them administrator.
Administrators can access the General Configuration of Print&Share and thus also change the Protection settings!
The option [Users can only use profiles that are accessible for them] is needed to force users to log in. Enabling this option is recommended in most cases. If this option is unchecked then every user can use all profiles, logged in or not. But depending on the permissions a user had, he or she can’t do certain things in the particular profile.
The button [Default Profiles] next to the option [Users can only use profiles that are accessible for them] is optionally and allows you to define a default profile for a user or group. There can only be one default global profile, but if that default profile is not available for the user or group, because of the configured permissions, you can define another profile that the user has access to.
3. Profile protection
If you want to set limitations on a profile level you have to add the user or group to the desired profile in the [Protections per profile] section.
When a user or group is only added in the [Protections per profile] section and not in the global protection section and the option [Users can only use profiles that are accessible for them] is active, then the user will only see the profiles where they were added to. This allows you to make only certain profiles visible for users or groups.
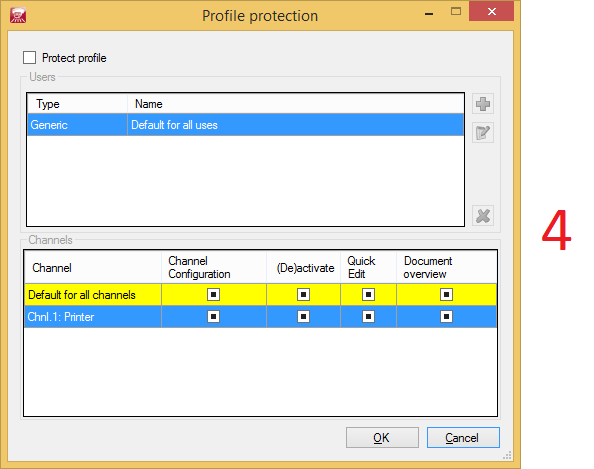
4. Channel protection
When clicking the [Edit] button in the [Protections per profile] section, you can even limit the functionality per channel for the users or groups.
You will see all channels that are in the selected profile:
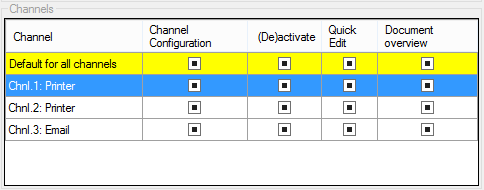
In this section you can define which options a user can use.
Option [Channel Configuration]:
Allow access to the channel configuration, and thus allow users to modify settings in the channel (e.g. change printer or file location).
Option [(De)activate]:
Allow user to activate or deactivate the channel by clicking on the checkbox in the upper left corner of a channel.
Option [Quick Edit]:
Allow users to access the Quick Edit dialog of the channel.
Option [Document overview]:
Allow users to access the Document overview of the channel.
Profile Storage
For this protection functionality it is recommended to store the profiles at the central location so that each Print&Share instance on different PCs use the same profiles and protection. You can change the location of the stored profiles in
[General Configuration] → [General settings] → [Location of the profiles:] and click [Edit].
There you can change the location of the DispatcherConfigs.xml file on a shared folder, e.g.: \\MyServer\Print&Share\Profiles\.
Permissions
Checkboxes have three states: [Inherit], [Enabled], [Disabled]:

Just like the Windows operating system, these permission settings will be evaluated and applied at runtime. Currently it is not possible to show the effective permissions for users or groups when defining them in a section. The reason for this is because some permissions are only evaluated at runtime (e.g. by making a call to Active Directory).
The order of inheritance for the permissions is: default permissions → global protection → per profile → per channel.
Permissions can be set for:
- Print&Share user(s)
- Windows user(s)
- Windows group(s)
- Windows computer(s)
- Organizational Unit(s) (AD OU)
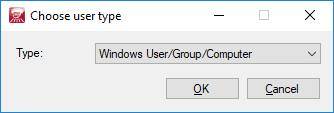
By selecting [Windows user/group/computer] when adding a user you can select a user from Active Directory. The screenshots below show how to select a group from Active Directory:
Click the Add button to add a user and select [Windows user/group/computer]
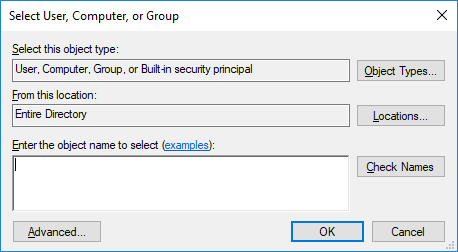
Click on the [Locations...] button and select your Active Directory location (e.g.: Entire Directory):
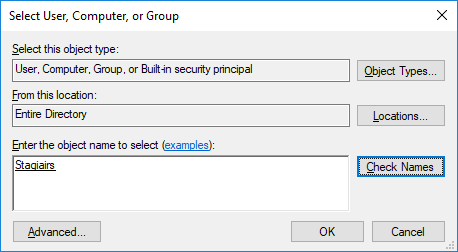
Now enter the name of the group or user and click the [Check Names] button:
Click [OK] to add the user or group that was found.
Now you will see a dialog to edit the user permissions:
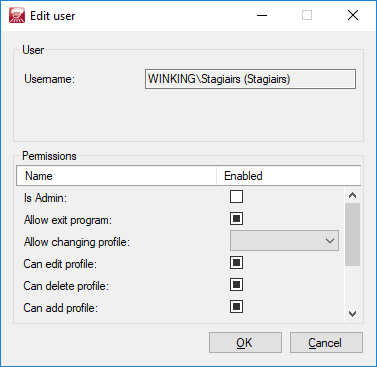
The [Is Admin] and [Allow changing profile] options are only visible when adding a user in the global protection section.
By default most of these settings will have the inherit value:

In a previous chapter we already told that permissions are evaluated and applied at runtime, not when configuring the options. This means if you enabled [Can edit profile] in the default permissions settings, you will not see this reflect in e.g. the global protection. In each section you just say if something is allowed/dissalowed, enabled/disabled or if you inherit the value. It is up to the administrator to wisely configure the permissions, just like in the Windows Operating System.
Using Print&Share with protection enabled
If protection is enabled and you print a document to Print&Share from a protected user you will be prompted with a dialog to log in.
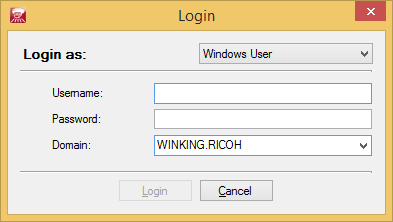
By default Print&Share will try to log in as the current logged in Windows user.
If this succeeds Print&Share will just start and you will not be prompted with a login dialog.
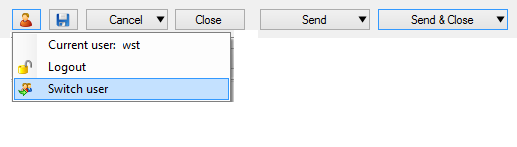
At the bottom of the Print&Share main window, you will see a new user-icon:

Clicking this user icon gives you the options to log out or switch user: